Just a 25-minute drive from Ottawa, the par 72 championship layout is renowned for its superb conditioning and unsurpassed service. The sprawling clubhouse affords panoramic views of the golf course and its groomed fairways that slope and turn, and are accented by streams, mature trees, and ponds.
No two holes are alike on our exceptional course, offering a diverse and exciting challenge for golfers of all levels. Our excellent design demands strategic club selection from our five sets of tees, ensuring a thoughtful and enjoyable round.
What truly sets Casselview Golf and Country Club apart from the rest is the meticulous care and attention devoted to our greens. Renowned for their exceptional quality and pristine condition, our greens offer golfers an unparalleled putting experience. Each day, our dedicated groundskeeping team meticulously tends to every detail, ensuring that our greens remain smooth, true, and consistent throughout the year. Whether you tee off from the championship tees at 6,705 yards or the forward tees at 5,330 yards, every guest is treated to a golfing paradise that combines excellence, affordability, and pure enjoyment.
Front
Back
Total Yards
Rating and Slope
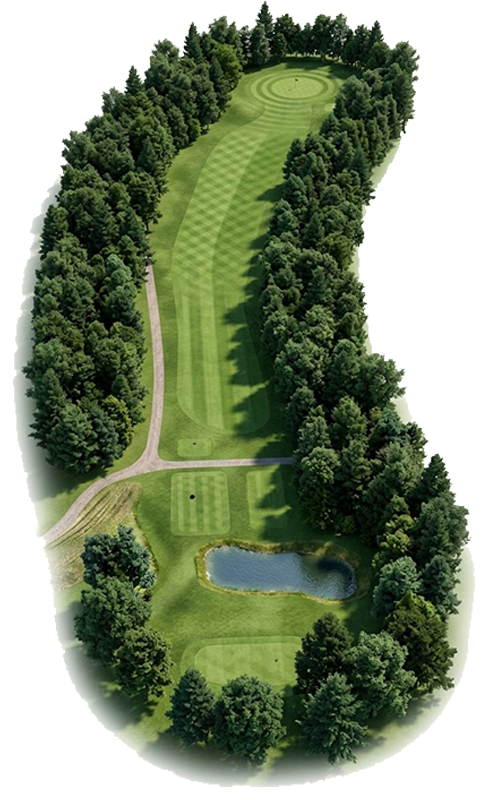
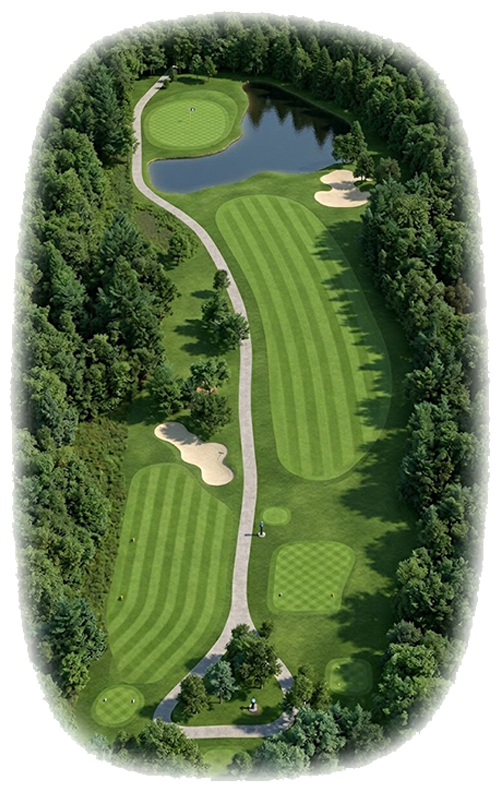
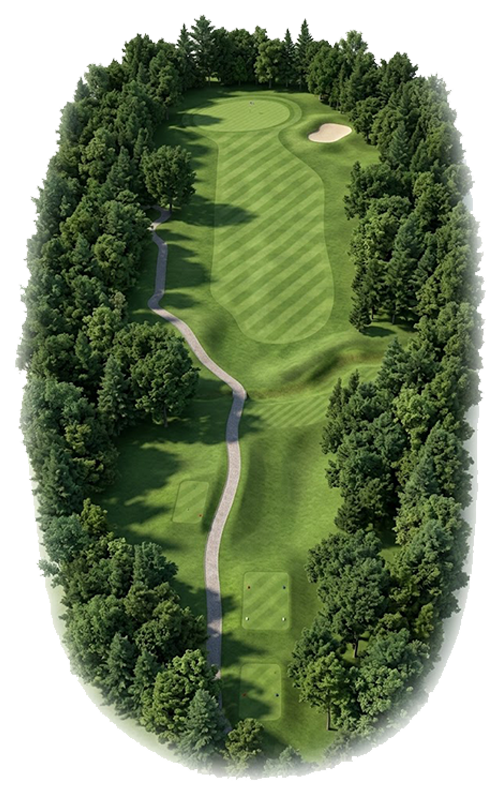
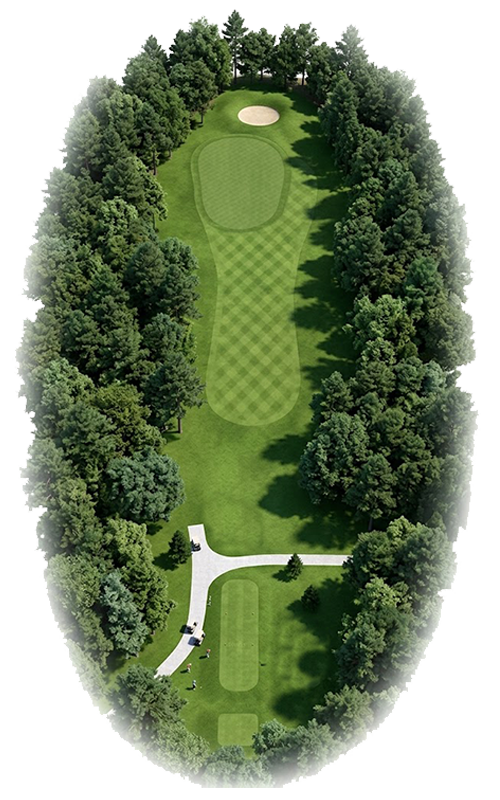
Hole 1
Yardage
Par
5
Men's Handicap
11
Women's Handicap
11
Pro Tip
We start off at Casselview, with an easy par 5 that overlooks Butternut Creek. On this hole, a tee shot to the left would be preferable as this hole is slightly angled to the right. Nous commençons à Casselview, par un par 5 facile surplombant Butternut Creek. Sur ce trou, un coup de départ à gauche est préférable car le trou est légèrement incliné vers la droite.
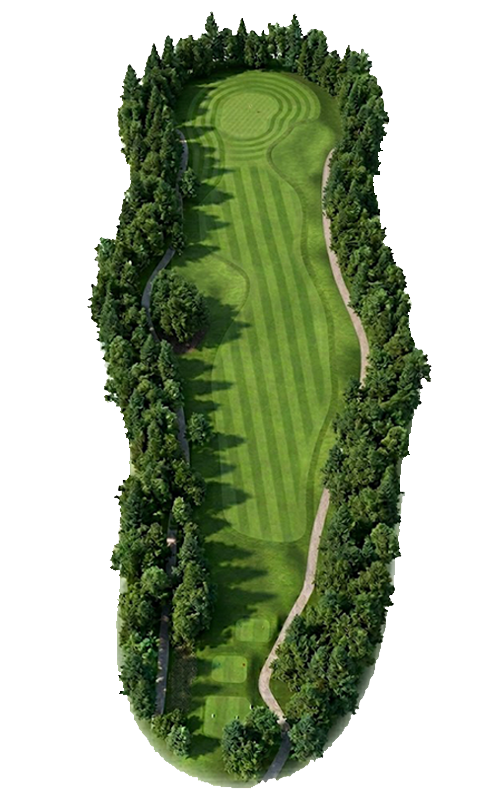
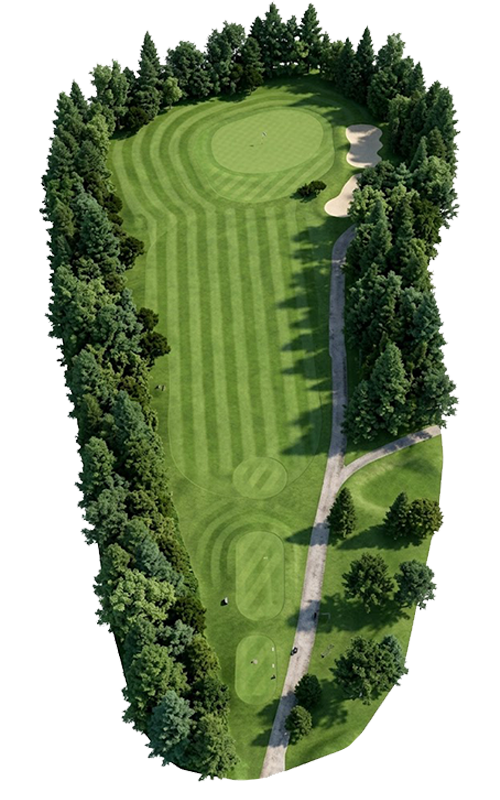
Hole 2
Yardage
Par
4
Men's Handicap
5
Women's Handicap
5
Pro Tip
A straight par 4, we recommend a 3 wood off the tee, as this hole is downhill into the fairway. Avoid the left side as it will leave you out-of bounds. On your approach shot, make sure to locate the flagstick’s position as the green is more than 30 yards long. Ce par 4 est en ligne droite ; nous recommandons un bois 3 au départ, car le fairway descend vers la gauche. Évitez le côté gauche, car vous risqueriez de sortir des limites du terrain. Pour votre coup d'approche, repérez bien le drapeau, car le green mesure plus de 30 mètres.
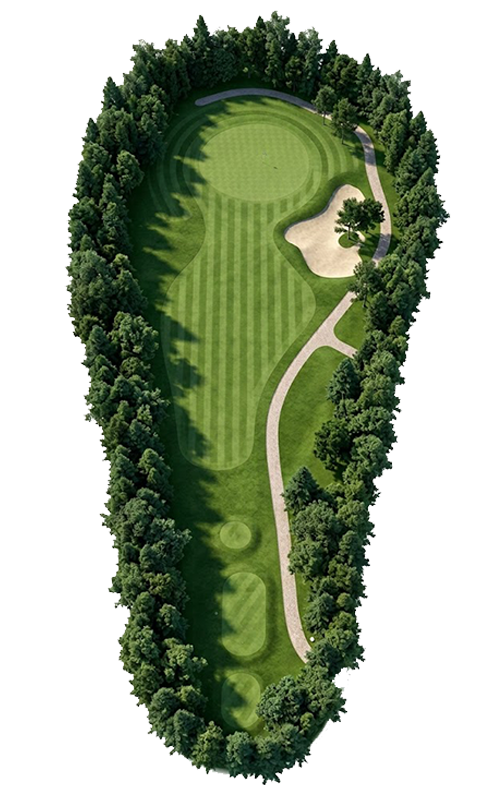
Hole 3
Yardage
Par
3
Men's Handicap
13
Women's Handicap
13
Pro Tip
On this downhill par 3, it’s important to avoid the bunker on the right. We suggest keeping your ball short of the hole, as the green slopes from back to front. Sur ce par 3 en descente, il est important d'éviter le bunker de droite. Nous vous conseillons de ne pas trop vous arrêter au bord du trou, car le green est en pente de l'arrière vers l'avant.
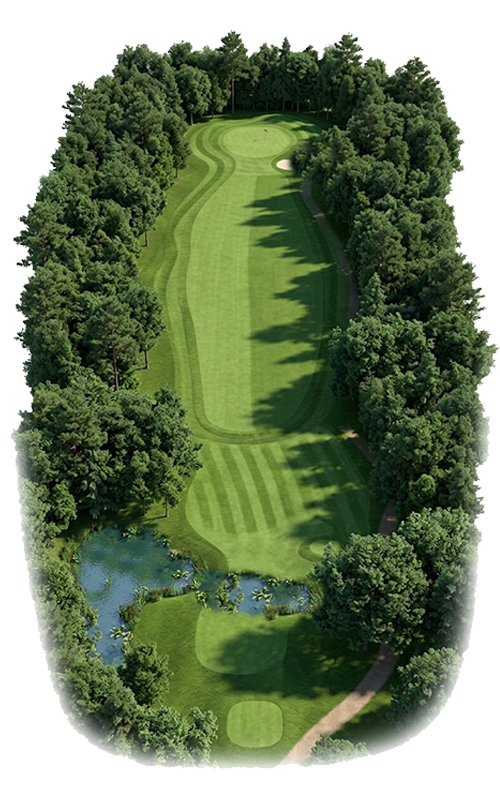
Hole 4
Yardage
Par
4
Men's Handicap
3
Women's Handicap
3
Pro Tip
A short par 4 with a narrow fairway, hitting a tee shot of 200 to 225 yards is all you need. Your 2nd shot should be accessible with a wedge or short iron in hand to cross the pond. Ce par 4 court, avec son fairway étroit, nécessite un coup de départ de 180 à 205 mètres. Votre deuxième coup devrait pouvoir franchir l'étang avec un wedge ou un fer court.
Hole 5
Yardage
Par
3
Men's Handicap
15
Women's Handicap
15
Pro Tip
This short par 3 with a large green is generally one of the easiest holes on the course. Avoid an out-of-bounds tee shot at the back or the sand trap to the right of the green. Ce court par 3, doté d'un grand green, est généralement l'un des trous les plus faciles du parcours. Évitez les coups de départ hors limites à l'arrière du green ou le bunker à droite.
Hole 6
Yardage
Par
5
Men's Handicap
1
Women's Handicap
1
Pro Tip
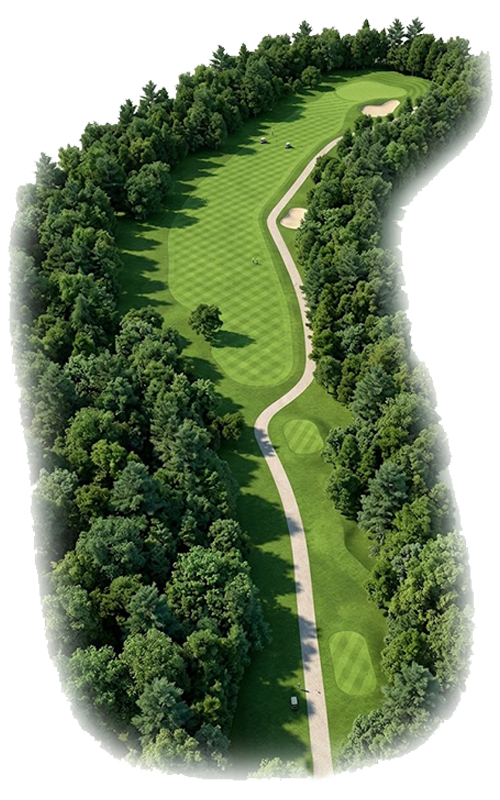
This difficult par 5 is the longest on the course. A tee shot in the center of the fairway is recommended, as there is an out of bounds on the left that runs all the way to the green. Trees are also in play if you miss your tee shot to the right. Watch out for the sand trap on the left near the green on your 3rd shot. Ce par 5 difficile est le plus long du parcours. Un coup de départ au centre du fairway est recommandé, car une zone hors limites à gauche s'étend jusqu'au green. Attention également aux arbres si votre coup de départ part à droite. Sur votre troisième coup, soyez vigilant face au bunker à gauche du green.
Hole 7
Yardage
Par
3
Men's Handicap
17
Women's Handicap
17
Pro Tip
This par 3 is very well protected by two bunkers, one on the front and the other to the left. This hole has an undulated green which can make putting tricky. Ce par 3 est très bien protégé par deux bunkers, l'un à l'avant et l'autre à gauche. Le green, légèrement vallonné, peut rendre le putting délicat.
Hole 8
Yardage
Par
4
Men's Handicap
9
Women's Handicap
9
Pro Tip
A straight away par 4 which includes a very generous fairway. You will need to cross the Butternut Creek if you want to reach it. The green plays higher up, with a wide but shallow green that slopes from back to front. Un par 4 en ligne droite doté d'un fairway très large. Il vous faudra traverser le ruisseau Butternut pour l'atteindre. Le green, situé en hauteur, est large mais peu profond et en pente de l'arrière vers l'avant.
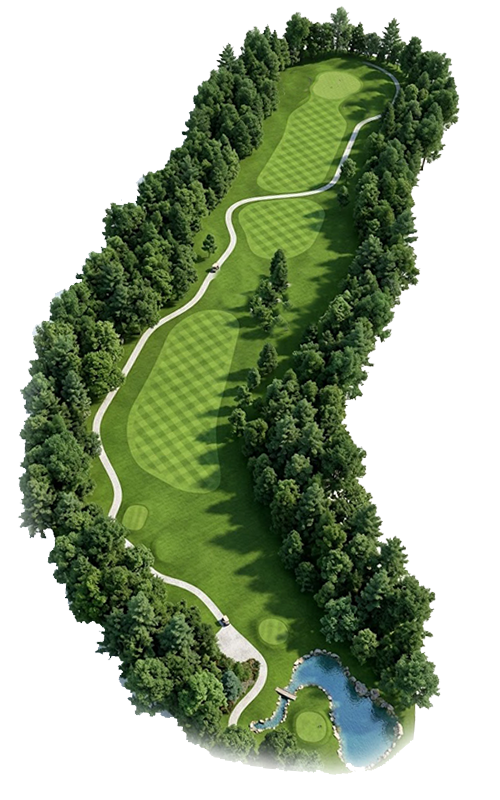
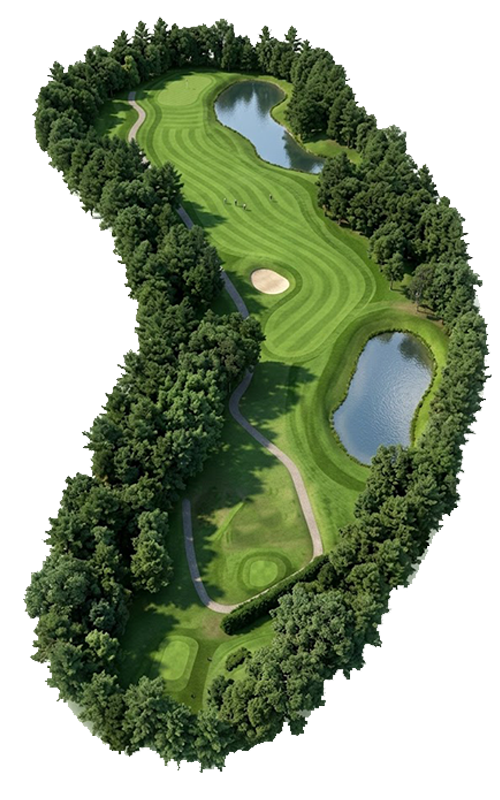
Hole 9
Yardage
Par
5
Men's Handicap
7
Women's Handicap
7
Pro Tip
This par 5 is a dogleg right. It typically plays the 2nd most difficult hole on the front 9 of the golf course. The tee shot should be directed left of the fairway as there are plenty of trees on the right to be avoided. The very demanding 2nd shot should be played short of Butternut Creek. Make sure to aim for the middle of the green on your 3rd shot, as this green slopes away in all directions. Ce par 5 est un dogleg à droite. Il est généralement considéré comme le deuxième trou le plus difficile des neuf premiers trous du parcours. Le coup de départ doit être dirigé à gauche du fairway, car de nombreux arbres bordent la droite et sont à éviter. Le deuxième coup, très exigeant, doit être joué court par rapport à Butternut Creek. Visez le centre du green pour votre troisième coup, car ce green est en pente dans toutes les directions.
Hole 10
Yardage
Par
4
Men's Handicap
6
Women's Handicap
6
Pro Tip
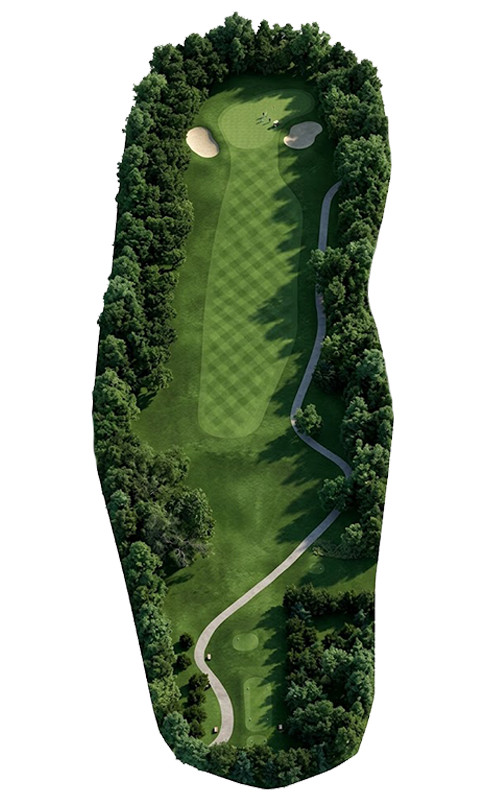
This hole is the longest par 4 on the course. Aim for the middle on your tee shot as trees border this hole on both sides. Ce trou est le par 4 le plus long du parcours. Visez le centre au départ, car des arbres bordent ce trou des deux côtés.
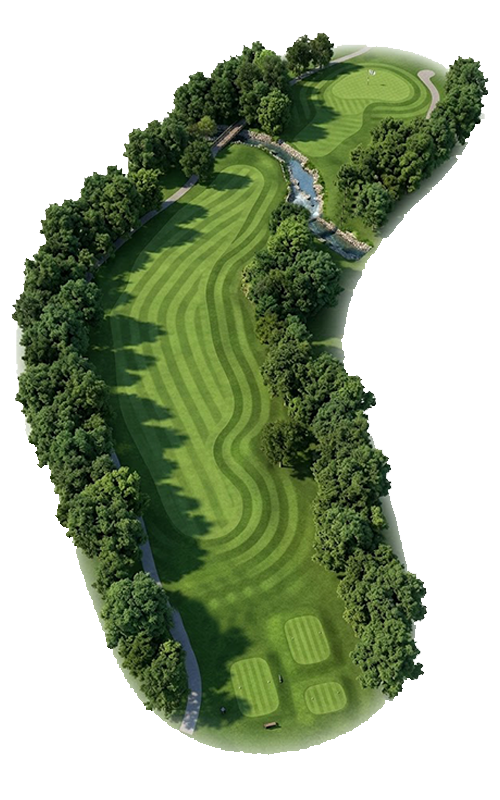
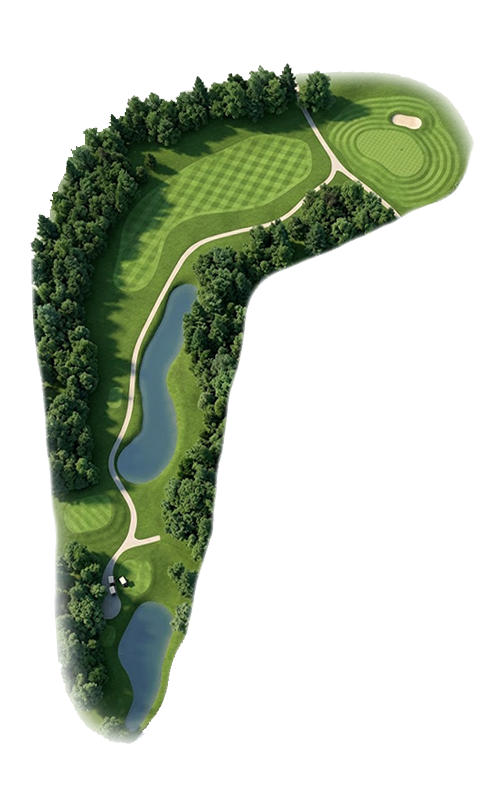
Hole 11
Yardage
Par
5
Men's Handicap
4
Women's Handicap
4
Pro Tip
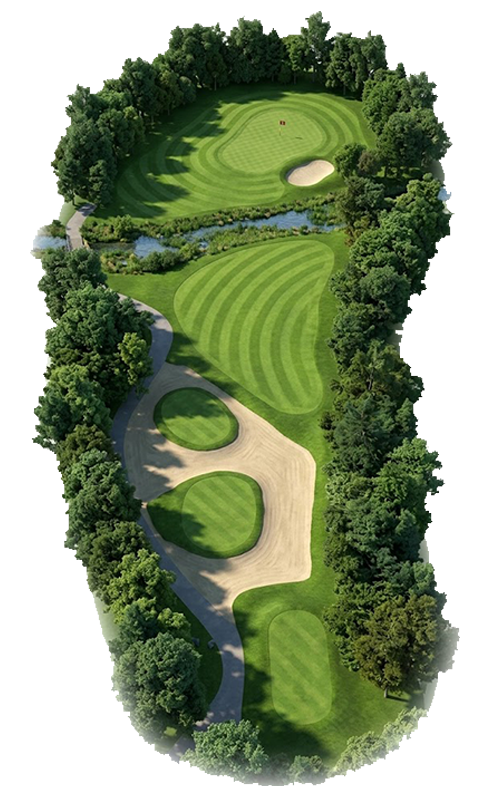
This short par 5 is a dogleg left. A tee shot to the right of the bunker gives you a chance to attack the green in 2. The 2nd shot is a risk/reward, be careful not to hit it right as there is a body of water awaiting your golf ball. Ce court par 5 est un dogleg gauche. Un coup de départ à droite du bunker vous donne l'occasion d'attaquer le green en deux coups. Le deuxième coup est risqué mais potentiellement payant : attention à ne pas dévier à droite, car un plan d'eau attend votre balle.
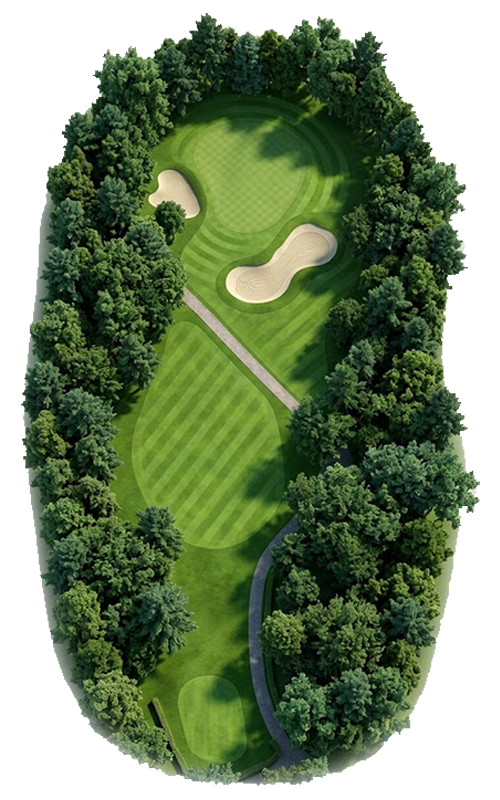
Hole 12
Yardage
Par
5
Men's Handicap
14
Women's Handicap
14
Pro Tip
A shot par 4 with a narrow fairway. Avoid the two bunkers on your approach shot on both the left and right side of green. This half-moon shaped green sees its first portion sloping from left to right. Un par 4 court avec un fairway étroit. Évitez les deux bunkers situés de part et d'autre du green sur votre coup d'approche. Ce green en forme de demi-lune présente une pente initiale de gauche à droite.
Hole 13
Yardage
Par
4
Men's Handicap
16
Women's Handicap
16
Pro Tip
Short par-4 with a narrow fairway on the 2nd shot to avoid the 2 bunkers, one to the left and the other to the right of the green. The first portion of the green slopes from left to right, with a half-moon green. Court par 4 avec un fairway étroit au deuxième coup pour éviter les deux bunkers, l'un à gauche et l'autre à droite du green. La première partie du green est en pente de gauche à droite et présente une forme de demi-lune.
Hole 14
Yardage
Par
3
Men's Handicap
10
Women's Handicap
10
Pro Tip
Our signature hole here at Casselview. A beautiful and challenging par 3 with water running along it, as well as a green that is significantly lower than the tees. The green has a sand trap to the right that should be avoided. It is also very undulated making it a challenge to putt. Notre trou signature à Casselview. Un magnifique et exigeant par 3, bordé d'eau, avec un green nettement plus bas que les départs. Un bunker se trouve à droite du green ; il est donc conseillé de l'éviter. Son relief prononcé rend le putting particulièrement difficile.
Hole 15
Yardage
Par
4
Men's Handicap
8
Women's Handicap
8
Pro Tip
A tee shot to the right of this par 4 should be avoided as there is a sleep slope that could make for a difficult 2nd shot. There are two menacing bunkers protecting this small and elevated green. Sur ce par 4, il est conseillé d'éviter de jouer à droite au départ, car une pente abrupte pourrait compliquer le deuxième coup. Deux bunkers menaçants protègent ce petit green surélevé.
Hole 16
Yardage
Par
3
Men's Handicap
18
Women's Handicap
18
Pro Tip
A narrow par 3 that is bordered by trees on both the left and right side. This two-tiered green is also backed by a sand trap. We recommend trying to reach the same platform where the flag is located. Un par 3 étroit, bordé d'arbres à gauche et à droite. Ce green à deux niveaux est également protégé par un bunker. Nous vous recommandons d'essayer d'atteindre la même plateforme que le drapeau.
Hole 17
Yardage
Par
4
Men's Handicap
12
Women's Handicap
12
Pro Tip
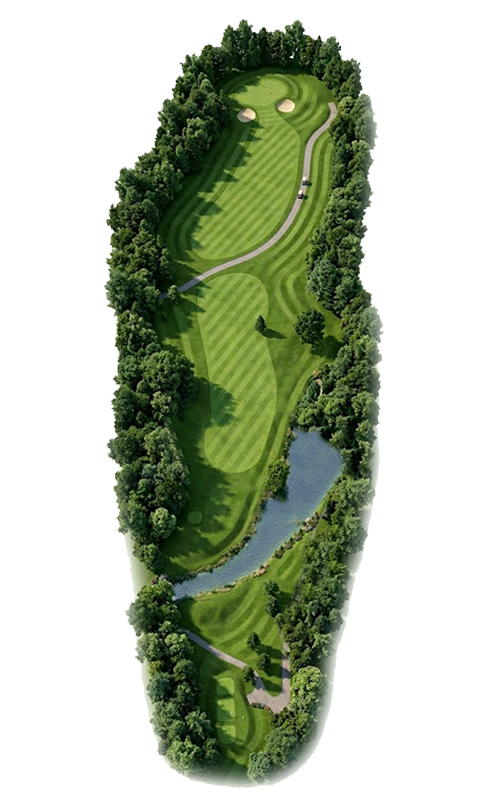
A dogleg right that will give you plenty of challenges with water in play off your tee shot, as well as trees on both sides. A second shot short of the flagstick is suggested, as this green slopes severely from the back to the front. Ce dogleg à droite vous posera de nombreux défis, avec de l'eau en jeu dès le départ et des arbres de chaque côté. Un deuxième coup court est conseillé, car le green est fortement en pente de l'arrière vers l'avant.
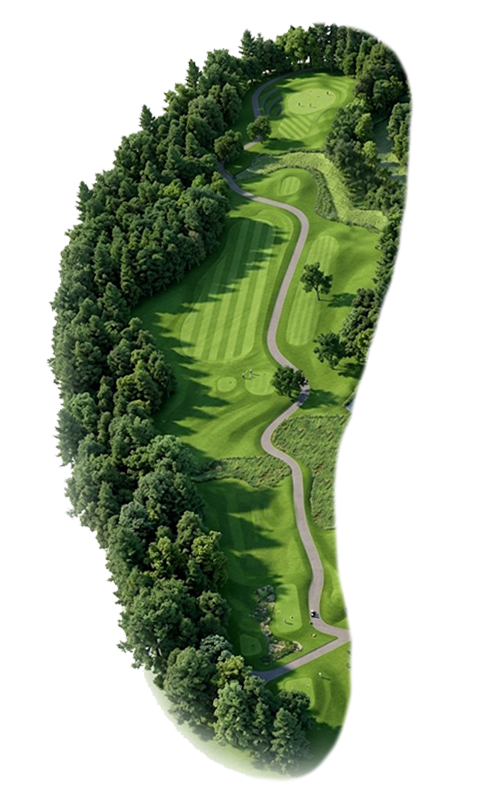
Hole 18
Yardage
Par
4
Men's Handicap
2
Women's Handicap
2
Pro Tip
We arrive at the final hole, which some would say is the toughest hole of the back nine. The 18th sees Butternut Creek run along it all the way to the green. A tee shot into the fairway is essential on your 2nd shot, as it’s difficult to get your feet level on this undulated fairway. Finally, we recommend avoiding the right on your approach shot. Nous arrivons au dernier trou, considéré par certains comme le plus difficile du retour. Le 18e est bordé par le ruisseau Butternut Creek jusqu'au green. Un coup de départ précis sur le fairway est essentiel pour votre deuxième coup, car il est difficile de se stabiliser sur ce fairway vallonné. Enfin, nous vous recommandons d'éviter la droite pour votre coup d'approche.
There are no public leagues available at Casselview Golf & Country Club.
There are no events available at Casselview Golf & Country Club.

Come back soon to view course sponsors and special offers for golfers.
No offers available at this time.
Check back later for exclusive deals.